How to Setup a Minimal API in .NET 7

In this tutorial we'll take a look at how to configure a minimal api in .NET 7. We'll also take a look at the new feature added into .NET 7 and how to properly set it up.
SO LET'S GET CODING!
The final code and instructions on how to set up Postman to hit your API endpoints can be found below. Entering your email will send you the files but will also subscribe to my bi-monthly newsletter. No spam-policy and unsubscribe anytime
If you prefer to the video tutorial, check it out
🚀 Install .NET 7
For this project I've used the following:
👉 .NET SDK: 7.0.100-preview.4.22252.9
👉 .NET Runtime 7.0.0-preview.4.22229.4
👉 Visual Studio 2022 17.3.0 Preview 1.1
👩💻 Setup a New Minimal Web API
The template is 'ASP.NET Code Web API' and disable the use of controllers from the project setup wizard. Also we're not using OpenAPI support so that should be disabled too. We're using SQL Server as our db provider, FluentValidation for integration with API filters and EF Core for managing migrations:
👉 FluentValidation.AspNetCore --version 11.0.2
👉 Microsoft.EntityFrameworkCore.SqlServer --version 7.0.0-preview.4.22229.2
👉 Microsoft.EntityFrameworkCore.Tools –version 7.0.0-preview.4.22229.2
Below is the final csproj file:
<Project Sdk="Microsoft.NET.Sdk.Web">

  <PropertyGroup>
    <TargetFramework>net7.0</TargetFramework>
    <ImplicitUsings>enable</ImplicitUsings>
  </PropertyGroup>

  <ItemGroup>
    <PackageReference Include="FluentValidation.AspNetCore" Version="11.0.2" />
    <PackageReference Include="Microsoft.EntityFrameworkCore.SqlServer" Version="7.0.0-preview.4.22229.2" />
    <PackageReference Include="Microsoft.EntityFrameworkCore.Tools" Version="7.0.0-preview.4.22229.2">
      <PrivateAssets>all</PrivateAssets>
      <IncludeAssets>runtime; build; native; contentfiles; analyzers; buildtransitive</IncludeAssets>
    </PackageReference>
  </ItemGroup>

</Project>
📃 Setup and Configure SQL Server Database
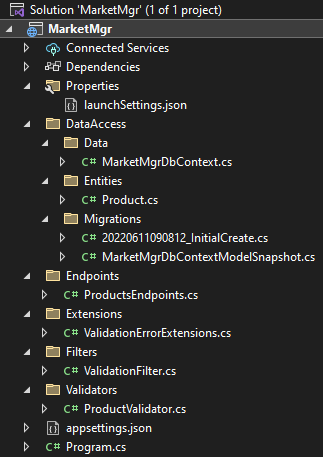
For reference, this is the final project directory:

We'll need an Db Context for our application. This is DataAccess / Data / MarketMgrDbContext.cs 👇
using MarketMgr.DataAccess.Entities;
using Microsoft.EntityFrameworkCore;

namespace MarketMgr.DataAccess.Data
{
    public class MarketMgrDbContext : DbContext
    {
        public MarketMgrDbContext(DbContextOptions<MarketMgrDbContext> options)
            : base(options) { }

        public DbSet<Product> Products => Set<Product>();
    }
}
And the product entity in DataAccess / Entities / Product.cs 👇
namespace MarketMgr.DataAccess.Entities
{
    public class Product
    {
        public int Id { get; set; }
        public string Name { get; set; }
        public decimal Price { get; set; }
        public int Weight { get; set; }
        public bool IsInStock { get; set; }
    }
}
Then, I usually change the Properties / launchSettings.json applicationUrl ports so that they're easier to remember, as follows 👇
"applicationUrl": "https://localhost:5001;http://localhost:5000"To connect to a database we need to set up a connection string in appsettings.json 👇
{
  "ConnectionStrings": {
    "DefaultConnection": "Server=.;Database=MarketMgrDb;Trusted_Connection=True;TrustServerCertificate=True"
  },
  "Logging": {
    "LogLevel": {
      "Default": "Information",
      "Microsoft.AspNetCore": "Warning"
    }
  },
  "AllowedHosts": "*"
}Now, in order to integrate the Db context with our app, the following line needs adding in Program.cs, right below WebApplication.CreateBuilder 👇
builder.Services.AddDbContext<MarketMgrDbContext>(opt =>
    opt.UseSqlServer(builder.Configuration["ConnectionStrings:DefaultConnection"]));
🚄 Create and Apply SQL Server Migrations
In your Package Manager Console run the following line to generate the initial migration. The name is InitialCreate, -c means Context and -o is the output directory 👇
Add-Migration InitialCreate -c MarketMgrDbContext -o DataAccess/MigrationsThis will generate a migration in DataAccess / Migrations (new directory created by EF Core Tools)
To run the migration and create the database with the new Product entity run the following still in PMC 👇
Update-Database InitialCreateIf you open SQL Server Object Explorer, you should end up with this 👇

🛑 Setup Fluent Validation
For this project, a simple FluentValidation setup has been created to illustrate the use of Filters. Here is Validators / ProductValidator 👇
using FluentValidation;
using MarketMgr.DataAccess.Entities;

namespace MarketMgr.Validators
{
	public class ProductValidator : AbstractValidator<Product>
	{
		public ProductValidator()
		{
			RuleFor(o => o.Name).NotNull().NotEmpty().MinimumLength(3);
			RuleFor(o => o.Price).NotNull().NotEmpty().NotEqual(0);
			RuleFor(o => o.Weight).NotNull().NotEmpty().NotEqual(0);
			RuleFor(o => o.IsInStock).NotNull();
		}
	}
}
As you can see a single method invocation can result in multiple errors, therefore, let's make an extension to combine the output into a single error message. We'll use this when invoking the validation. Here's Extensions / ValidationErrorExtensions.cs 👇
using FluentValidation.Results;

namespace MarketMgr.Extensions
{
	public static class ValidationErrorExtensions
	{
		public static string GetErrors(this List<ValidationFailure> errors)
		{
			var errorMessages = "";
			errors.ForEach(err => errorMessages += err.ErrorMessage + " ");

			return errorMessages;
		}
	}
}👮♂️ Setup Endpoints Filters
The Minimal API endpoints filters (aka Route Handler Filters) is a new feature introduced in .NET 7. This allows us to short-circuit the process before it even gets to the delegate method passed into the endpoint. We'll setup a generic ValidationFilter that derives from IRouteHandlerFilter. This interface is enabled in .NET 7. This is Filters / ValidationFilter.cs 👇
using FluentValidation;
using MarketMgr.Extensions;

namespace MarketMgr.Filters
{
	public class ValidationFilter<T> : IRouteHandlerFilter where T : class
	{
		private readonly IValidator<T> _validator;

		public ValidationFilter(IValidator<T> validator)
		{
			_validator = validator;
		}

		public async ValueTask<object> InvokeAsync(RouteHandlerInvocationContext context, RouteHandlerFilterDelegate next)
		{
			var parameter = context.Parameters.SingleOrDefault(p => p.GetType() == typeof(T));
			if (parameter is null) return Results.BadRequest("The parameter is invalid.");

			var result = await _validator.ValidateAsync((T)parameter);
			if (!result.IsValid)
			{
				var errors = result.Errors.GetErrors();
				return Results.Problem(errors);
			}

            // now the actual endpoint execution
			return await next(context);
		}
	}
}
The T in out ValidationFilter class will be defined by our Product entity. Notice that the filter logic occurs before we return await next(context). Up until that point, if anything goes wrong, i.e: validation fails, the process is short-circuited.
🚩 Create Minimal API Endpoints
We'll create a separate class for our products endpoints, as this is a post .NET 6 template, we'll work with minimal API. However, we won't add all the endpoints in Program.cs, but in a separate one, Endpoints / ProductsEndpoints.cs. ProductsEndpoints will be an extension class on the WebApplication.
The first part will contain a static method called MapProductEndpoints that will consists of the normal app.MapGet, app.MapPost, etc. These functions each take in a delegate (the actual functionality of the endpoint). All those functions, List, Get, Create, will sit underneath this method. Here's Endpoints / ProductEndpoints.cs 👇
using FluentValidation;
using MarketMgr.DataAccess.Data;
using MarketMgr.DataAccess.Entities;
using Microsoft.EntityFrameworkCore;
using MarketMgr.Filters;

namespace MarketMgr.Endpoints
{
    public static class ProductEndpoints
    {
        public static void MapProductEndpoints(this WebApplication app)
        {
            app.MapGet("/products", List);
            app.MapGet("/products/{id}", Get);
			app.MapPost("/products", Create).AddFilter<ValidationFilter<Product>>();
			app.MapPut("/products", Update).AddFilter<ValidationFilter<Product>>();
            app.MapDelete("/products/{id}", Delete);
        }

        public static async Task<IResult> List(MarketMgrDbContext db)
        {
            var result = await db.Products.ToListAsync();
            return Results.Ok(result);
        }

        public static async Task<IResult> Get(MarketMgrDbContext db, int id)
        {
            return await db.Products.FindAsync(id) is Product product
                ? Results.Ok(product)
                : Results.NotFound();
        }

        public static async Task<IResult> Create(MarketMgrDbContext db, IValidator<Product> validator, Product product)
        {
            db.Products.Add(product);
            await db.SaveChangesAsync();

            return Results.Created($"/products/{product.Id}", product);
        }

        public static async Task<IResult> Update(MarketMgrDbContext db, Product updatedProduct)
        {
            var product = await db.Products.FindAsync(updatedProduct.Id);

            if (product is null) return Results.NotFound();

            product.Name = updatedProduct.Name;
            product.Price = updatedProduct.Price;
            product.Weight = updatedProduct.Weight;
            product.IsInStock = updatedProduct.IsInStock;

            await db.SaveChangesAsync();

            return Results.NoContent();
        }

        public static async Task<IResult> Delete(MarketMgrDbContext db, int id)
        {
            if (await db.Products.FindAsync(id) is Product product)
            {
                db.Products.Remove(product);
                await db.SaveChangesAsync();
                return Results.Ok(product);
            }

            return Results.NotFound();
        }
    }
}
Notice the lines 15 & 16. We chain the AddFilter<ValidationFilter<Product>>(). This is how we make use of our generic validation filter.
🥳 Register the ProductEndpoints
All we need to do now, to register these endpoints to our application is go in Product.cs and right below builder.Build(); add app.MapProductEndpoints();. This is the final result 👇
using FluentValidation;
using MarketMgr.DataAccess.Data;
using MarketMgr.DataAccess.Entities;
using MarketMgr.Endpoints;
using MarketMgr.Validators;
using Microsoft.EntityFrameworkCore;

var builder = WebApplication.CreateBuilder(args);

builder.Services.AddScoped<IValidator<Product>, ProductValidator>();
builder.Services.AddDbContext<MarketMgrDbContext>(opt => opt.UseSqlServer(builder.Configuration["ConnectionStrings:DefaultConnection"]));

var app = builder.Build();

app.MapProductEndpoints();

app.Run();
Nice one 🎉 You've just set up a Minimal API starter project for an enterprise application. Fire up Postman and try these out on port 5001. If you're unsure, download the project files at the beginning of this article.
I hope this tutorial has been helpful to you. Please feel free to leave questions or suggestions below, I'd love to hear from you!
Until next time, stay safe 👋
