Authentication and Authorization with Okta in .NET 6 Blazor Server
Today I'll show you how to Secure a Blazor Server Application, by setting up Authentication with Okta.
😎 SO LET'S GET CODING!
Check out the tutorial on YouTube and the complete code on GitHub 👉 github.com/iulianoana/okta-authentication-tutorial
Create a new Blazor Server project
The target framework at the time of doing this tutorial is .NET 6. Leave the defaults and click create. I called it Blazer.
Change the app url ports
Under Properties > launchSettings.json change the ports to 5001 (https) & 5000 (http). Here's what the Properties/launchSettings.json should look like:
{
  "iisSettings": {
    "windowsAuthentication": false,
    "anonymousAuthentication": true,
    "iisExpress": {
      "applicationUrl": "http://localhost:17549",
      "sslPort": 44325
    }
  },
  "profiles": {
    "Blazer": {
      "commandName": "Project",
      "dotnetRunMessages": true,
      "launchBrowser": true,
      "applicationUrl": "https://localhost:5001;http://localhost:5000",
      "environmentVariables": {
        "ASPNETCORE_ENVIRONMENT": "Development"
      }
    },
    "IIS Express": {
      "commandName": "IISExpress",
      "launchBrowser": true,
      "environmentVariables": {
        "ASPNETCORE_ENVIRONMENT": "Development"
      }
    }
  }
}
Install Dependencies
The following dependencies must be installed with the latest versions available at the time of doing this tutorial:
- Okta.Sdk --version 5.6.0
- Microsoft.AspNetCore.Authentication.OpenIdConnect --version 6.0.5
And this is the Blazer.csproj file:
<Project Sdk="Microsoft.NET.Sdk.Web">

  <PropertyGroup>
    <TargetFramework>net6.0</TargetFramework>
    <Nullable>enable</Nullable>
    <ImplicitUsings>enable</ImplicitUsings>
  </PropertyGroup>

  <ItemGroup>
    <PackageReference Include="Microsoft.AspNetCore.Authentication.OpenIdConnect" Version="6.0.5" />
    <PackageReference Include="Okta.Sdk" Version="5.6.0" />
  </ItemGroup>

</Project>
Create a new Application in Okta
Navigate to developer.okta.com and create a free account. Then go to Applications > Applications submenu and create a new App integration. Select the following parameters:
- Sign-in method: OIDC - OpenID Connect
- Application type: Web Application
- Name: Blazer (or your choice)
- Grant type: default Authorization code. Also select Refresh Token
- Sign-in redirect URIs: https://localhost:5001/authorization-code/callback
- Sign-out redirect URIs : https://localhost:5001/signout-callback-oidc
- Base URIs: https://localhost:5001/
The Authorization Code Flow an OAuth 2.0 type of grant that allows the client app to swap an authorization code for an Access Token (or JWT). The client sends a request up to the Authorization Server (Okta in this case) for an authorization code. Then swaps that for an Access Token that can be used to access resources, otherwise inaccessible.
If you wish to properly understand the OAuth 2.0 Authorization Code Flow, you can download a mini-PDF below 👇. It will worth it!
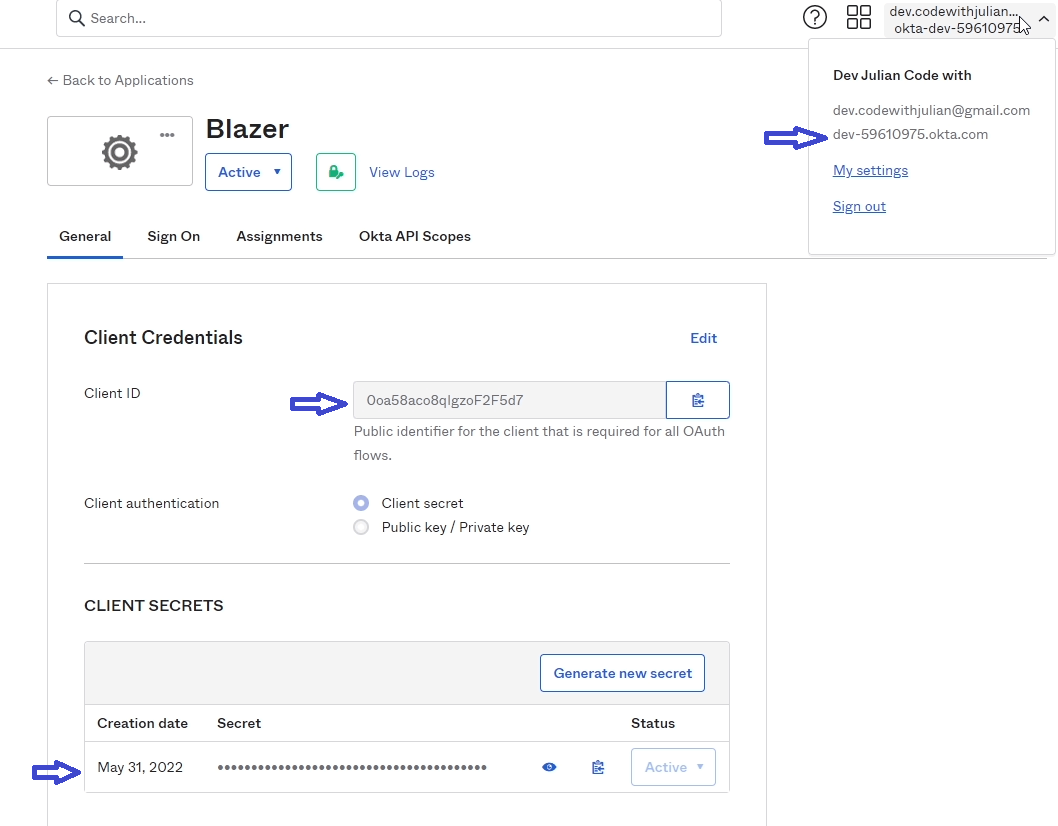
Modify appsettings.json
This is where you specify the app integration and Okta account credentials within your app. You'll need the Client ID and secret and the okta domain (for the issuer). The issuer is composed like following: https:// + Okta_Domain + /oauth2/default.
Here is the appsettings.json:
{
  "Logging": {
    "LogLevel": {
      "Default": "Information",
      "Microsoft.AspNetCore": "Warning"
    }
  },
  "AllowedHosts": "*",
  "Okta": {
    "Issuer": "https://dev-OKTA_ID_HERE.okta.com/oauth2/default", // i.e: 59610975
    "ClientId": "YOUR_CLIENT_ID_HERE", // i.e: 0oa58aco8qIgzoF2F5d7
    "ClientSecret": "CLIENT_SECRET_HERE" // i.e: MUfF0Y5K_1lY8e_APc9A2HK-gZqo8jiqE1uHXVG0
  }
}
Configure the Blazor app to use Okta as the External Auth Provider
This is the part where we setup Authentication and install OpenID Connect within our application. This is being done in Program.cs. We first add in Authentication and initialise the Default schemes (Authentication, SignIn, SignOut). This is then followed by setting up OIDC with Okta. The block is ended by adding cookie authentication in our application.
Then, towards the bottom of the file, we add authentication, authorization and map controllers. Here's what Program.cs looks like:
using Blazer.Data;
using Microsoft.AspNetCore.Authentication.OpenIdConnect;
using Microsoft.AspNetCore.Authentication.Cookies;

var builder = WebApplication.CreateBuilder(args);

// Add services to the container.
builder.Services.AddRazorPages();
builder.Services.AddServerSideBlazor();
builder.Services.AddSingleton<WeatherForecastService>();

builder.Services.AddAuthentication(authOptions =>
{
    authOptions.DefaultAuthenticateScheme = CookieAuthenticationDefaults.AuthenticationScheme;
    authOptions.DefaultSignInScheme = CookieAuthenticationDefaults.AuthenticationScheme;
    authOptions.DefaultSignOutScheme = CookieAuthenticationDefaults.AuthenticationScheme;
    authOptions.DefaultChallengeScheme = OpenIdConnectDefaults.AuthenticationScheme;
}).AddOpenIdConnect(oidcOptions => {
    oidcOptions.ClientId = builder.Configuration["Okta:ClientId"];
    oidcOptions.ClientSecret = builder.Configuration["Okta:ClientSecret"];
    oidcOptions.CallbackPath = "/authorization-code/callback";
    oidcOptions.Authority = builder.Configuration["Okta:Issuer"];
    oidcOptions.ResponseType = "code";
    oidcOptions.SaveTokens = true;
    oidcOptions.Scope.Add("openid");
    oidcOptions.Scope.Add("profile");
    oidcOptions.TokenValidationParameters.ValidateIssuer = false;
    oidcOptions.TokenValidationParameters.NameClaimType = "name";
}).AddCookie();

var app = builder.Build();

// Configure the HTTP request pipeline.
if (!app.Environment.IsDevelopment())
{
	app.UseExceptionHandler("/Error");
	// The default HSTS value is 30 days. You may want to change this for production scenarios, see https://aka.ms/aspnetcore-hsts.
	app.UseHsts();
}

app.UseHttpsRedirection();

app.UseStaticFiles();

app.UseRouting();

app.UseAuthentication();
app.UseAuthorization();

app.MapControllers();
app.MapBlazorHub();
app.MapFallbackToPage("/_Host");

app.Run();
Add a LoginController
The LoginController is a simple MVC controller that contains 2 methods, Login and Logout that handle what their name implies. This sets up the right actions for when we want to log in our out. In case the user isn't authenticated (or if they click Login), they will be redirected to the login page using the Login endpoint of this controller. If the user clicks Log out, we'll send a GET request to the Logout method.
The methods are simple in design. For the Login endpoint, we check if the user is already authenticated, if not then return a Challenge (which has them to authenticate). The Logout method method ensures the user isn't authenticated before signing them out and redirecting them to the requested URI. Here's what the Controllers/LoginController.cs looks like:
using Microsoft.AspNetCore.Authentication;
using Microsoft.AspNetCore.Mvc;

namespace Blazer.Controllers
{
	public class LoginController : Controller
	{
		[HttpGet("Login")]
		public IActionResult Login([FromQuery] string returnUrl)
		{
			var redirectUri = returnUrl is null ? Url.Content("~/") : "/" + returnUrl;

			if (User.Identity.IsAuthenticated)
			{
				return LocalRedirect(redirectUri);
			}

			return Challenge();
		}

		// This is the method the Logout button should get to when clicked.
		[HttpGet("Logout")]
		public async Task<ActionResult> Logout([FromQuery] string returnUrl)
		{
			var redirectUri = returnUrl is null ? Url.Content("~/") : "/" + returnUrl;

			if (!User.Identity.IsAuthenticated)
			{
				return LocalRedirect(redirectUri);
			}

			await HttpContext.SignOutAsync();

			return LocalRedirect(redirectUri);
		}
	}
}
Add LoginDisplay.razor
This is a separate component that we're creating to contain the two buttons, log in and log out, based on the user authentication state. We're making use of the <AuthorizeView> component which we'll later expose throughout our project from App.razor.
The <AuthorizeView> component enables two other components that we'll use: <Authorized> and <NotAuthorized>. They will show the contents of those components based on the user authentication state (whether or not they're signed in). So if they're authenticated, we show a Logout button, otherwise Login. Here's the Shared/LoginDisplay.razor:
<AuthorizeView>
	<Authorized>
		<a href="#">@context.User.Identity.Name</a>
		<a href="Logout">Logout</a>
	</Authorized>
	<NotAuthorized>
		<a href=@($"Login?returnUrl={ReturnUrl}")>Log in</a>
	</NotAuthorized>
</AuthorizeView>
The ReturnUrl is defined at init time by grabbing the Uri and turning it into a base relative path, this is the Shared/LoginDisplay.razor.cs:
using Microsoft.AspNetCore.Components;


namespace Blazer.Shared
{
	public partial class LoginDisplay
	{
		[Inject] public NavigationManager Navigation { get; set; }
		[Parameter] public string ReturnUrl { get; set; }

		protected override async Task OnInitializedAsync()
		{
			ReturnUrl = Navigation.ToBaseRelativePath(Navigation.Uri);
		}
	}
}
Add the LoginDisplay component to MainLayout.razor
The MainLayout is the default layout of our blazor app and we'll add the newly created <LoginDisplay /> component in the top navbar area (above the About anchor tag). This is the MainLayout.razor:
@inherits LayoutComponentBase

<PageTitle>Blazer</PageTitle>

<div class="page">
    <div class="sidebar">
        <NavMenu />
    </div>

    <main>
        <div class="top-row px-4">
            <LoginDisplay />
            <a href="https://docs.microsoft.com/aspnet/" target="_blank">About</a>
        </div>

        <article class="content px-4">
            @Body
        </article>
    </main>
</div>
Setup unauthorized redirect
This component will be rendered in case of an unauthorized access of a particular page/resource. If the user isn't authenticated, or hasn't got the correct permissions to view/edit that page/resource, this component will used to redirect them to the login (Login endpoint form the LoginController.cs).
This will be a new component within the Shared namespace. This will be a Blazor component but we'll only use the backend for this. Call it RedirectToLogin. All thisn is doing is grabbing the Uri (parsed as a base relative path) and navigating to the Login 'page'. So in essence sending a GET request to the Login endpoint when initialised. The front-end .razor file is empty. Here's Shared/RedirectToLogin.razor.cs:
using Microsoft.AspNetCore.Components;

namespace Blazer.Shared
{
	public partial class RedirectToLogin
	{
		[Inject] public NavigationManager Navigation { get; set; }

		protected override async Task OnInitializedAsync()
		{
			var returnUrl = Navigation.ToBaseRelativePath(Navigation.Uri);

			Navigation.NavigateTo($"Login?returnUrl={returnUrl}", true);
		}
	}
}
Setup the App.razor
Here's where we'll enable the authentication state within our project. This is done in App.razor and we must wrap the <Router> component in two components: <CascadingValue> this is used to expose the AccessToken to all of our components. And the <CascadingAuthenticationState> which is the one to enable the authentication state (so we can make use of those <Authorized> / <NotAuthorized> components). You will notice we're also making use of the later one, and in it, we're rendering the just created <RedirectToLogin /> component. This way, if a user is not logged in, the app redirects them to the login page (in there, the authentication flow is started and the user will be sent to Okta to login, then redirected back to us. Those redirect URLs help us do that).
This is App.razor:
<CascadingValue Name="AccessToken" Value="AccessToken">
    <CascadingAuthenticationState>
        <Router AppAssembly="@typeof(App).Assembly">
            <Found Context="routeData">
                <AuthorizeRouteView RouteData=@routeData DefaultLayout="@typeof(MainLayout)">
                    <NotAuthorized>
                        <RedirectToLogin />
                    </NotAuthorized>
                    <Authorizing>
                        Authorizing...
                    </Authorizing>
                </AuthorizeRouteView>
            </Found>
            <NotFound>
                <PageTitle>Not found</PageTitle>
                <LayoutView Layout="@typeof(MainLayout)">
                    <p role="alert">Sorry, there's nothing at this address.</p>
                </LayoutView>
            </NotFound>
        </Router>
    </CascadingAuthenticationState>

</CascadingValue>

@code{
    [Parameter] public string AccessToken { get; set; }
}
Run the app and test it
When you run the app and click Login, most likely you will be logged in without having to input your username and password. This is because you are already logged into Okta, from when you've created your account and app integration. If you want, log out of Okta to test this properly.
Setup authorization inside pages
Say we want to secure the default FetchData component, as in, no unauthenticated users could access it. That is quite simple. Head over to that component's razor page (Pages/FetchData.razor), and add an [Authorize] attribute at the top of the page, nothing else changes, like so:
@page "/fetchdata"
@attribute [Authorize]

<PageTitle>Weather forecast</PageTitle>

@using Blazer.Data
@inject WeatherForecastService ForecastService

<h1>Weather forecast</h1>

<p>This component demonstrates fetching data from a service.</p>

@*The rest of the code below*@
And to hide the menu button from Shared/NavMenu.razor, just wrap it in an <AuthorizeView> component, like so:
<div class="nav-item px-3">
    <AuthorizeView>
        <NavLink class="nav-link" href="fetchdata">
            <span class="oi oi-list-rich" aria-hidden="true"></span> Fetch data
        </NavLink>
    </AuthorizeView>
</div>
And that's it. If you have any questions or suggestions, feel free to leave them here 👇 or on YouTube. Until next time, stay safe 👋
